
Glaze Theory – Part IV
Hello friends! This is the final post in the glaze-theory series. Today I will discuss how to identify a good glaze using the theoretical foundation we have developed.
Theoretical knowledge allowed potters to rely on more than experience, identifying possible glaze faults before testing them in the kiln and saving considerable time and money. Glaze study developed from an empirical activity into a science. Practice remains indispensable: correct application and firing control both contribute to successful firings. Theory is simply another tool for achieving good results.
In the previous post, I explained how the Seger unity molecular formula gave us a deeper understanding of glaze behaviour. We will now examine the parameters used to characterise a good glaze. These apply to functional ceramics; glazes outside them may still be aesthetically suitable for other ceramic work.
Guidelines for a Good Glaze
1 – It Must Contain Enough Silica
Silica is the backbone of a glaze and its principal glass former. Without enough silica, a good glaze cannot be made.
2 – It Must Contain Enough Alumina
Potters believed that a good glaze required a minimum alumina content. However, a glaze can contain a substantial amount if its fluxes and boron compensate for the addition.
3 – The Glaze Must Melt Completely
This may seem obvious, but many apparently matt or semi-matt glazes look that way because they have not melted completely. Incomplete melting causes a range of problems in functional ceramics. Monitor the firing and always use pyrometric cones to ensure the pieces have received the temperature required to form their glazes. Also use recipes suited to your kiln’s firing temperature.
4 – Use Moderate Levels of Colourants and Opacifiers
Above a certain level, these constituents can leach from even an excellent glaze’s glassy network, contaminating food or drink in contact with it. Some are toxic. Although the amount released may be small, these pieces are used daily, so care is important.
The table below gives indicative percentages relative to the base glaze, presented here as formulation guidance. These are not universal safety limits and do not certify that the ware is suitable for food contact. Behaviour depends on the complete composition, raw materials and firing; the finished ware requires appropriate assessment and testing.
| Copper Carbonate | 4,0% |
| Copper Oxide | 2,0 – 2,5% |
| Chromium Oxide | 3,0% |
| Cobalt Carbonate | 3,0% |
| Cobalt Oxide | 2,0% |
| Iron Oxide | 10,0 – 15,0% |
| Manganese Dioxide | 4,0% |
| Nickel Oxide | 3,0% |
Glazes with a metallic appearance almost always contain excessive colourant levels and should be examined carefully.
5 – Maintain a Good Balance of Primary and Secondary Fluxes
In glaze-chemistry terminology, primary fluxes, or R2O, belong to the alkali-metal group: Li, K and Na. They initiate glaze melting.
Secondary fluxes, or RO, keep melting under control. These include alkaline-earth metals and other constituents: Mg, Ca, Sr, Ba and Zn. Using the Seger formula, the relationship is written R2O:RO.
Historical and contemporary research has demonstrated that an R2O:RO ratio of 0.3:0.7 is ideal for maximum durability in functional glazes.
6 – Use Boron for Firings Below Cone 10
Cone 6 kilns and recipes have become popular. Benefits include shorter firings, energy savings and ceramics as strong as those fired hotter. At these intermediate temperatures, however, silica alone does not melt completely.
Boron is a non-toxic glass former that, together with silica, offers a useful alternative for cone 6 firings. It is ideally introduced through frits, which make it insoluble.
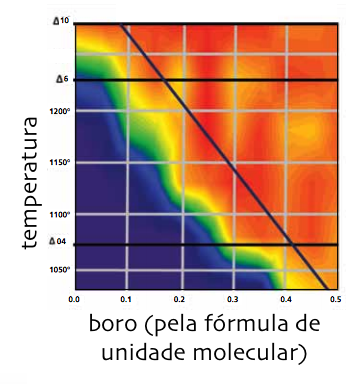
The graph below shows how much boron should be added relative to the maximum firing temperature. Orange and red indicate well-melted glossy glazes; dark blue indicates melting problems.
7 – Adjust the Coefficient of Thermal Expansion
While a piece is in the kiln and its glaze is liquid, the glaze and clay adhere completely. As the kiln cools, both contract. If their contraction differs, two situations can arise:
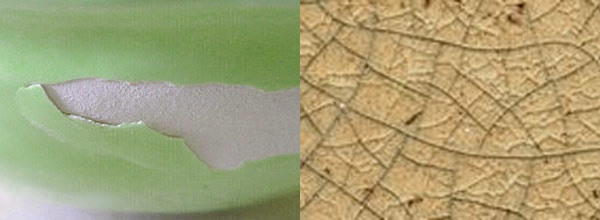
- if the glaze contracts more than the clay, it crazes, as shown on the right in the photograph below;
- if the clay contracts more than the glaze, the glaze can detach, like paint flaking off a wall, as shown on the left.
This is undesirable in functional ceramics. The solution is to find a glaze whose thermal expansion is compatible with the particular clay body. It must therefore be addressed individually, although some general precautions are useful:
- Do not apply an excessively thick glaze layer.
- Large pieces present greater challenges in glaze–body interaction.
- Check that alumina and silica levels are within acceptable ranges; see the Stull chart.
Specialist laboratories have dilatometers that precisely measure a clay body’s thermal expansion, making glaze-fit adjustment easier. Studio potters generally rely on testing. Almost all glaze-calculation programs provide calculated expansion coefficients. Change constituents to adjust the glaze according to the following principles:
If the glaze crazes, lower its coefficient of thermal expansion.
If it is flaking off, raise its coefficient of thermal expansion.
The English and Turner table below gives expansion coefficients for principal oxides and may help. Sodium and potassium have high coefficients, and excessive use can cause crazing. Lithium and magnesium, by contrast, can help reduce this problem.
| Oxide | Coefficient (x10-6/ºC) |
| BaO | 14,0 |
| CaO | 16,3 |
| MnO2 | 5,7 |
| Li2O | 7,45 |
| MgO | 4,5 |
| K2O | 39,0 |
| Na2O | 41,6 |
| ZnO | 7,0 |
| Fe2O3 | 10,4 |
| TiO2 | 10,6 |
| B2O3 | -6,53 |
| Al2O3 | 1,4 |
| SiO2 | 0,5 |
| PbO | 10,6 |
| P2O5 | 7,45 |
| SnO2 | 3,65 |
| ZrO2 | 2,3 |
| SrO | 13,5 |
The Stull Chart
In 1912, researcher R. T. Stull developed a chart to visualise glaze behaviour as alumina and silica levels changed.
Flux content was fixed at 0.3 moles of sodium and 0.7 moles of calcium, an R2O:RO ratio of 0.3:0.7. All tests were fired to cone 11.
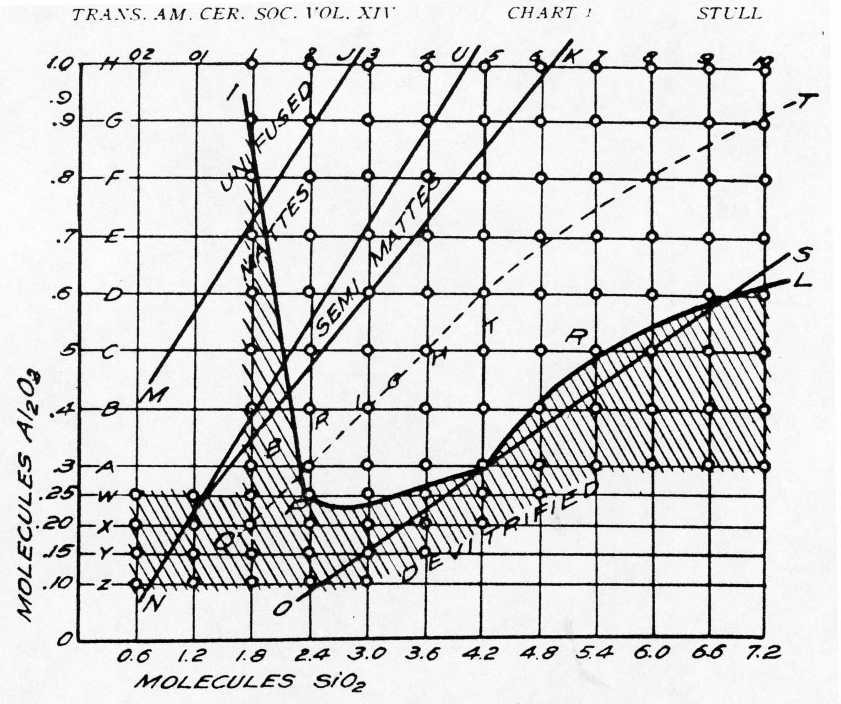
Stull bounded the principal glaze area with straight lines through points I, P, R and L. He used the following boundaries between glaze types:
- M – J – unmelted – matt
- N – U – matt – semi-matt
- N – K – semi-matt – glossy
- Q – T – glossy
- O – S – glossy – unvitrified (underfired)
The hatched area represents glazes that crazed.
With fluxes held constant, silica and alumina levels and their proportions determine whether a glaze is glossy, matt, crazed or underfired. Stull predicted matt glazes at silica-to-alumina ratios of 5:1 or less. Increasing the ratio produces a glossy glaze.
He also found that glazes would be underfired above a silica-to-alumina ratio of 12:1.
He predicted crazing in the hatched area, where both alumina and silica levels are low.
The chart closely matches experimental results and remains in use, including at other firing temperatures. McLeod reproduced the experiment at cone 6, adding 0.15 moles of boron to compensate for the lower temperature. The results were almost identical.
On sites such as Glazy.org, all glazes in the database are plotted on the Stull chart.
Conclusion
The interaction of glaze constituents during firing is intricate and mysterious to many. Much of what happens is beyond the potter’s control. Our great challenge is to master these earth materials, including the fit between clay and glaze that forms our finished work. Uncertainty is part of the process, but understanding how constituents become glaze helps us progress more quickly in this art.
Sources:
- McLeod, Sue. Understanding cone 6 Nceca presentation. 2018.
- Site Glazy.org. http://help.glazy.org/concepts/limits/#glaze-limit-formulas
- Katz, Matt. Boron in Glazes. Ceramic Network. https://ceramicartsnetwork.org/wp-content/uploads/2008/10/TF_BoroninGlazes_0912.pdf
- Hesselberth, John. Roy, Ron. Mastering Cone 6 Glazes. Ed. iBook.
About the Author: Gustavo Assis

Related Posts

Olá boa tarde estou iniciando a vitrificação e gostei muito da apresentação didática com bom embasamento. Parabéns
Olá Sara. Muito obrigado pela leitura!
Ótima leitura, muito obrigada.
Thank you very much for reading!
Ola Gustavo, ótimo material, de fácil leitura e entendimento. Parabéns pelo seu empenho nas pesquisas. Inez.
Olá Inez, muito obrigado pela leitura!
Boa noite Gustavo, tudo bem? Parabéns por compartilhar seu conhecimento. Gostaria de saber se poderia passar seu e-mail ou telefone para conversamos a respeito desse tema.
Olá Emerson. Meu contato está disponível na página “contatos”. Obrigado!
Boa Noite Gustavo, você está de parabéns, pelo empenho e pela abnegação em dividir conhecimento de maneira altruista, coisa muita rara hoje em dia. Obrigada por tudo!
Obrigado pela leitura e pelas pelas palavras de apoio. Um abraço!
Olá Gustavo, tudo bem? desejo que sim. Estou sinterizando lodo galvânico em superfície de argilas só que quebram ( o lodo). Na literatura diz que tenho que aplicar esmalte tipo fritira. Eu não tenho nem ideia do que seja isso. Você pode me ajudar? Devo comprar o esmalte comercial? se puder me ajudar eu agradeço e parabéns pelos posts.
Olá Franklin, eu desconheço o termo fritira. Existe, porém, uma matéria-prima chamada frita muito usada em esmaltes. Trata-se de um composto de vidro e outros elementos que tem a função de suprir o esmalte de elementos insolúveis e fácil fusão ao ser aquecido. Espero ter ajudado.
Olá Gustavo!!!!
Gostei muito do artigo. Bastante didático. Obrigada
Obrigado Margarete pela leitura!
A minha cerâmica com o esmalte transparente ,,,só craquela depois que tiro do forno….o que pode ser??
O craquelado pode ter várias origens e, na minha opinião, é um dos problemas mais difíceis para serem resolvidos na cerâmica. Pode ser argila mal ou muito queimada, pode ser um problema no seu esmalte, pode ser um problema na formulação da argila ou pode ser um problema na interação argila/ esmalte. Teste vários esmaltes em várias argilas e em diferentes espessuras de aplicação. Use cones pirométricos e documente seus testes. Espero ter ajudado!
Olá! Tudo bem?
Gostaria de tirar uma dúvida, peças utilitárias com esmalte craquelado não podem mais ser utilizadas?
Olá Gabriela, o uso de peças craqueladas pode ser feito sem problemas. O que pode acontecer em casos extremos é a proliferação de microorganismos nas fendas dos craquelados. Se isto ocorrer, coloque a peça mergulhada em uma solução com água sanitária e o problema estará resolvido.
Muita generosidade em compartilhar esse material com tanta riqueza de detalhes. Grata!
Thank you for reading!
muto bom essas informações trabalho com pintura em cerâmica e estou me aprofundando nesse assunto sobre s esmaltes. obrigado pelas dicas.
Que bom que te ajudou! Obrigado pela Leitura!